Thursday, 19 March 2015

Constructing a Lace Front Wig


Lace front wigs are used a lot in stage, TV and film. The wig has a front edge that is made of a very fine, almost invisible lace which means an exact copy of the artist's hair line can be made whilst giving the illusion that the hair is growing directly from the scalp.

Fitting

The purpose of the fitting is to discuss the initial design and physical appearance of the artist's character and generally develop further ideas for the transformation requirement.

1) Wrap or pull back actors hair completely flat to the head.


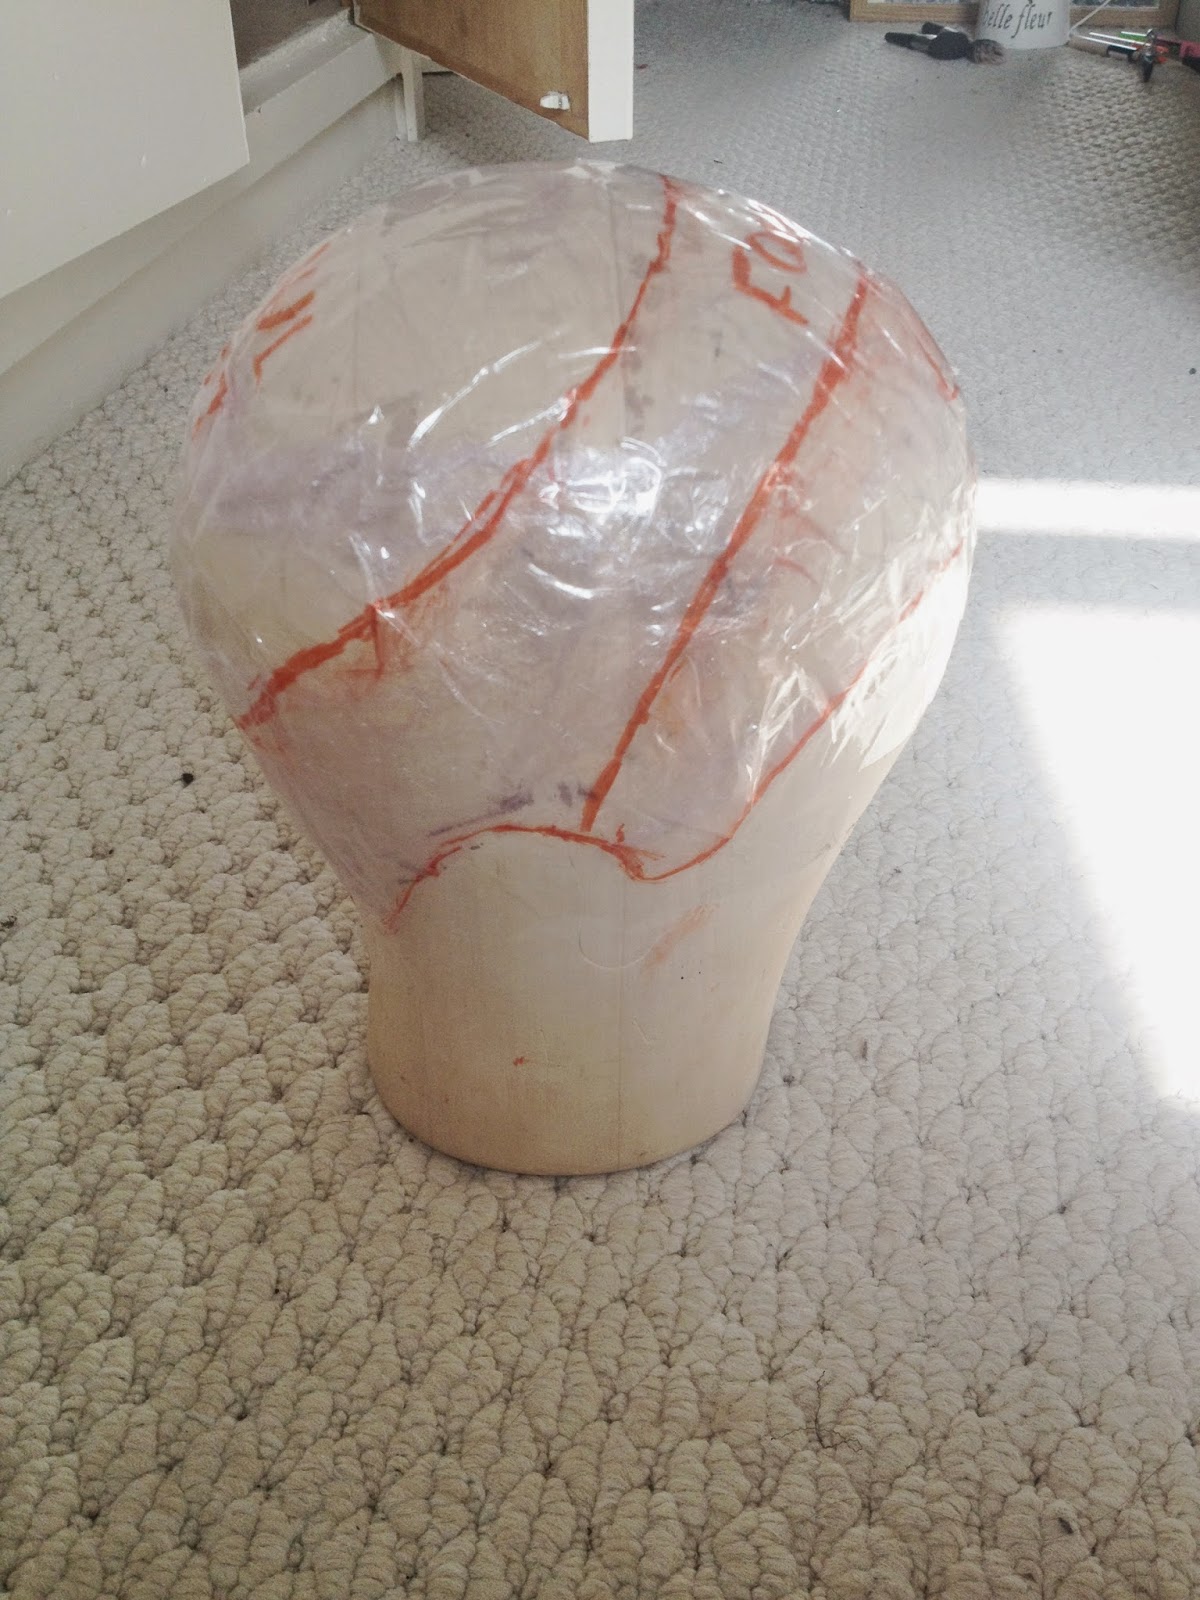
2) Wrap the head in cling film leaving excess at sides and back then cover in sellotape.


3) Draw outline of hair line then put another layer of sellotape over lines.

4) Take head measurements to keep as reference whilst making the wig.


Template

1) Choose a block the same of similar size to the head measurements taken, or pad out block with tissue to make the right size.

2) Sellotape the template to the block.

3) Draw on the 3 parts of the wig - foundation line, circle of coul net and lace front then sellotape to seal. Lines should be even and should mirror each other side to side.


Foundation Net

1) The foundation net starts about 2.5 inches from the front of the template.

2) Fold the net in half to find the middle point and place the middle point in the centre of the head - pin in place.

3) Follow the net round the side and pin in place.

4) Put darts in the back side of the net (nearest coul net) where needed to follow the curve of the head. Darts should go in the direction hair would be brushed.


5) At the back tuck one side underneath the other and pin in place.

6) Put two lines of whipping up the back to tie the two sides together about 2cm apart. Cut the excess away.


7) Fold the bottom edge of the wig over twice and whip all the way round to hem the bottom.


 8) Cut the excess off the back right to the coul net line.

Coul Net

1) Put the coul net on vertically so it stretches lenghtways.

2) Find the middle bit of the square and pin this to the middle of the circle.

3) Pin in 4 corners 1.5 cm overlapping the foundation net.

4) Make darts in between each pin again going in the direction of the hair brushing.


5) Whip down the overlap making two lines again running 2cm apart from eachother - cut off the excess.


Lace Front.

1) Lay the lace flat at the front of the block so it would lie flat on the face without sticking upwards.

2) Pin the lace further back at the sides so to not rip the lace that will be knotted into.

3) Pin at the top with a 1.5cm overlapping the founation net.

4) Make darts where needed, keeping them back from the hairline so they can't be seen.


5) Whip the lace to the founadtion in two lines again.


If the wig needs a parting then an L-shape would come out of the founadtion net and be made in lace front.


Evaluation.

Overall I was very happy with my result of constructing a lace front wig template. I feel I wrapped the hair well considering my model has hip length hair and although it didn't lie completely flat it is close to how the head shape should be. My drawing of the foundation lines could have been better as they are slightly uneven meaning the foundation net is slightly smaller on one side than the other, next time I would use a tape measure to make sure all the lines stay the same distance apart. I was very happy with how the lace and net construction went and think I stayed very neat and even all over. A few of my darts could have been a bit straighter but this may be because tutu net is difficult to make lie flat and this would be different if I was making it out of proper wig net. There is also one side where the hemming is quite small because I didn't quite leave enough foundation net overlapping so next time I would be more conscious of this. Although I will probably not be making a full wig for this project this is a very useful skill to learn and what tat may come in use for another project/ in the future.

Monday, 29 April 2013

Wig Template Making Research

The first thins we learnt this project is making a template for a wig. It was important to then do research on this to see the different ways wig templates could be made for different contexts (film, theater etc.). I found from doing this that methods have changed over the years as well as materials, especially with the wise in HD film so the need for less noticeable lace. I looked in a few different books to see some different techniques.

Botham, M and Sharrad, L (1982) Manual of Wigmaking.  3rd edition. London: William Heinemann ltd.page 60 & 61

Botham, M and Sharrad, L (1982) Manual of Wigmaking.  3rd edition. London: William Heinemann ltd. page 62 & 63

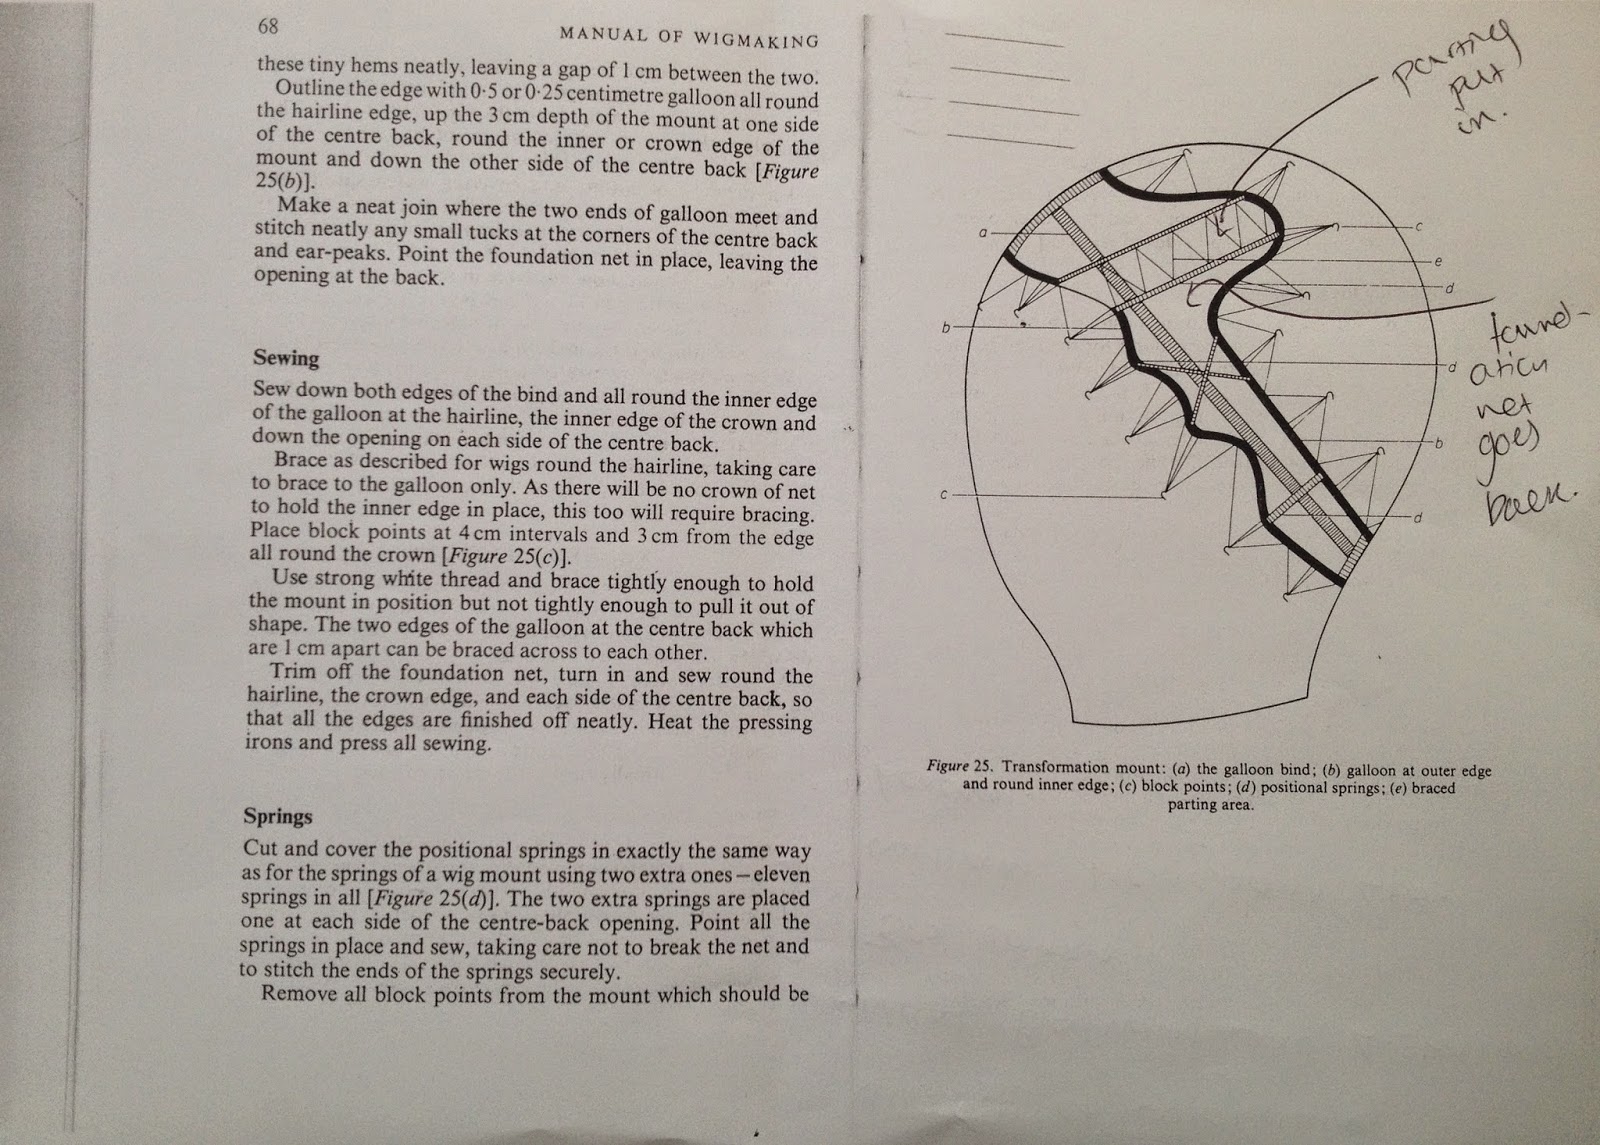
Botham, M and Sharrad, L (1982) Manual of Wigmaking.  3rd edition. London: William Heinemann ltd. page 68 & 69


Ruskia, M and Lowery, A (2010) Wig making and styling: a complete guide for theatre and film. Burlington: Focal Press page 88 

Ruskia, M and Lowery, A (2010) Wig making and styling: a complete guide for theatre and film. Burlington: Focal Press page 89

Ruskia, M and Lowery, A (2010) Wig making and styling: a complete guide for theatre and film. Burlington: Focal Press page 90

Ruskia, M and Lowery, A (2010) Wig making and styling: a complete guide for theatre and film. Burlington: Focal Press page 92

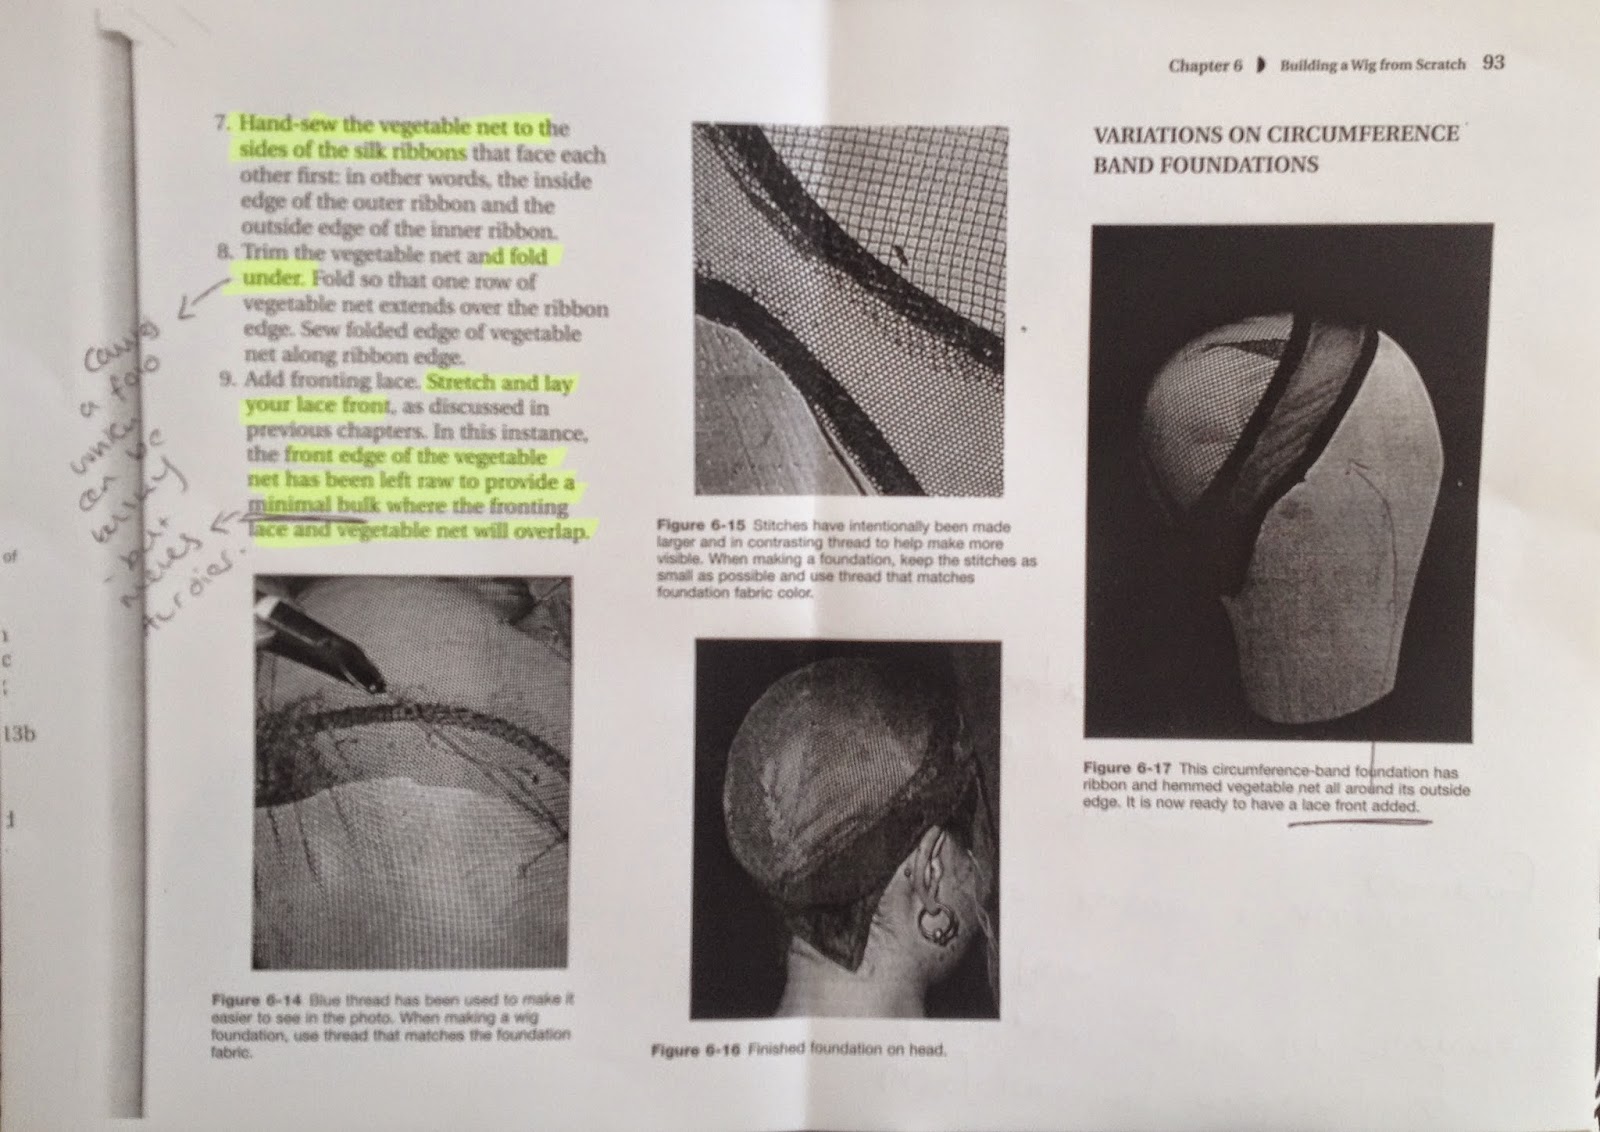
Ruskia, M and Lowery, A (2010) Wig making and styling: a complete guide for theatre and film. Burlington: Focal Press page 93

Monday, 19 March 2012

Body Painting


Preparation & Planning

- Normally have an idea of what is wanted in the body paint
- Prepare stencils before hand
- Can put glitter on a thin layer of cap plastic before hand
- Gems can be prepared on net before hand
- Tell the model what to expect
- Check if there are showers etc. to clean up model on site

Model Selection

- Choose a slender model - small boobs and muscle tone is good
- Dancers are good models
- Must be able to stand up for a long time
- Talk through the products being used
- Bring dressing gown, flip flops/slippers etc. for the model

Budgeting

- Mix fullers earth with paint pigment, cheaper than a lot of products
- Plastic sheets in a roll
- Cheap kid brushes for one off uses

Requirements

- mix products with IPA for waterproofing
- nudity issue - some places demand bras be worn however there are other methods to cover nipples eg. latex and tissue.
- Paint the breast area first as this will be model feel more comfortable and covered.
- Stand the models in slippers, fluffy socks and a hat to keep the end of the body warm.
- Normally get no more than three hours for a body paint.

Products.

- Don't use makeup brushes on body painting
- Creamy colours build up well
- If colours stain the skin (MAC products do quite often) use head and shoulders to remove.
- kryolan - shimmering vision
- use water soluble glue so it washes off well
- house of glam dolls

Body Painters/Makeup artists

- Jenny Shircore
- Phyllis Cohen
- Carolyn Roper
- BodyPaint London
- Carolyn Cowen
- Joanne Gair
- World body paint/paintopia

Fullers Earth

- layer of dermashield
- layer of aquacolour
- can add with ready mix paint pigment to fullers earth to colour cheaply.


This was a quick experiment with colours and glitter that didn't go very well. I was looking at different tones of blue and going for something inspired by the sea but as I didn't plan it properly it ended up being very messy. It was good however to get the feel for using aquacolours and body painting.


This was another quick experiment, doing something more detailed. I was a lot happier with this outcome as it's a lot neater and has a much clearer image. I used a white background to make the flower stand out more then different tones of purple, white and black to the petals to add depth. Although the neatness of the outside lines could be improved in this piece I think this would look nice as part of a much larger set of flowers.


This was another quick experiment I did, this time using fullers earth. I did a base colour of purple aquacolour then to oppose this I coloured the fullers earth green with a pigment paint and layered this on top. Whilst it was still wet I drew patterns into it so the purple completely showed through. I was very happy with how the fullers earth dried as the cracks were good and showed the pink through underneath. Again this would be nice as part of a bigger piece. 


This was the bigger bodypainting piece I did over the 2 days. I was inspired by an image of pintrest and based my paining off of this. I used aquacolours and started with the blues first before moving onto the whites and yellows. I think the thing that brought the piece to life was the finishing touches - I flicked on white and neon ornage paint, sprinkled on glitter and added a gold pigment to the planet. This added a more 3D effect to the piece and a lot of small detail. I was extremely happy with this piece as bodypainting is not my strong point and I struggle with it. However I worked hard and took my time on this piece and also had a clear plan of what I wanted before I started. Next time I would perhaps extend the piece down the arms and add a few more bits of finer detail.